脚本编程:Powershell:使用WinSCP Assembly实现文件上传
大约 4 分钟
背景
前篇文章 在SQL Agent里运行Powershell实现文件上传介绍了一个文件上传需求,把远程SQLServer上的一个文件上传到sftp服务器。具体实现是通过Powershell调用WinSCP的Assembly实现的,本篇详细介绍。
先说WinSCP
WinSCP是Windows下一个很常用、很受欢迎的开源FTP/SFTP客户端,版本更新的很快。
官方主页 https://winscp.net/eng/download.php sha'g WinSCP supports five transfer protocols:
SFTP (SSH File Transfer Protocol);
FTP (File Transfer Protocol);
SCP (Secure Copy Protocol);
WebDAV (Web Distributed Authoring and Versioning);
S3 (Amazon S3).
另外,还提供了Assembly(API),可以编程实现文件上传、下载和同步功能,本文重点。
实现
提示
以下是使用sftp协议举例实现文件上传,FTP实现差不多.
准备工作
- 1台可运行sftp服务器(可以使用 sftpGo 实现部署)和账户,步骤略。
- WinSCP Assembly文件
- sftp账户公钥和私钥。
脚本
<#
- Function: File Uploading through WinSCP/sftp with SSL Auth option, without clear text password provided
- Prerequisites: WinSCP Assembly
- Author: tlin82
#>
Function Upload-FileBySFTP() {
param (
[string]$LocalFilePath,
[string]$RemoteFilePath
)
#Load WinSCP Assembly
Add-Type -Path "C:\ssh\WinSCPNet.dll"
# Set up session options for a SFTP Session
# follow code snippet can be generated by WinSCP Session Code Template Generator. See WinSCP documentation for details.
$sessionOptions = New-Object WinSCP.SessionOptions -Property @{
Protocol = [WinSCP.Protocol]::Sftp
HostName = "my-sftp-server.example.com"
PortNumber = 2022
UserName = "test"
SshHostKeyFingerprint = "ssh-ed25519 255 QDYKkMIo/hIkobREzJBLeI1KyHkXDwrkGGJtmISVwwc"
##Private Key
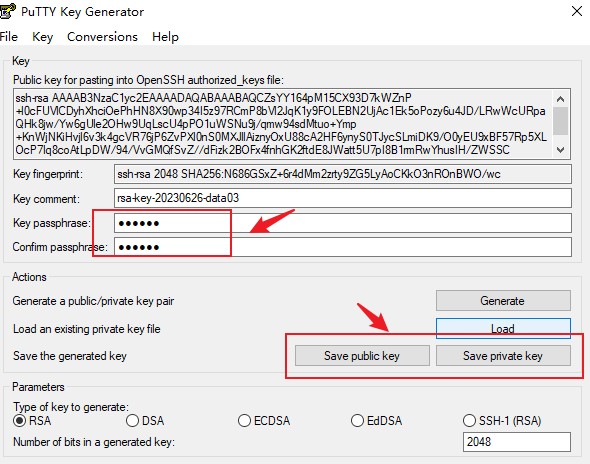
SshPrivateKeyPath = "C:\ssh\private.ppk"
# Use Pass phrase to protect the private key
PrivateKeyPassphrase = "acJ-Ub-YHgloHh7hbR6a"
}
# Set up transfer options
$transferOptions = New-Object WinSCP.TransferOptions
$transferOptions.TransferMode = [WinSCP.TransferMode]::Binary
#Speed limit to 500KB/s
$transferOptions.SpeedLimit = 500
# Enable Resume Support for all files.
$transferOptions.ResumeSupport.State = [WinSCP.TransferResumeSupportState]::On
$session = New-Object WinSCP.Session
try
{
# Connection
$session.Open($sessionOptions)
# Upload the file to the FTP server
$session.PutFiles($LocalFilePath, $RemoteFilePath, $False, $transferOptions).Check()
}
finally
{
$session.Dispose()
}
}
if (Test-Path -Path "C:\ssh\WinSCPNet.dll") {
Upload-FileBySFTP -LocalFilePath "D:\source\file_to_be_uploaded.zip" -RemoteFilePath "/file_to_be_uploaded.zip"
}
# Provision WinSCP assembly on the server where the file is uploaded from. The assebmly can be found in WinSCP install directory.
# if not available on the server, either download from a http server that holds the WinSCP assembly. In this case, the http server is served with Node.js Express, a simple http server.
# Alternatively get a copy of the assembly files from anywhere else . Whatever,as long as the assembly is available for the file uploading function to load.
else {
$url_lib = "http://http-server:3000/download/1"
$outputPath_lib = "C:\ssh\WinSCPNet.dll"
$url_exec = "http://http-server:3000/download/2"
$outputPath_exec = "C:\ssh\WinSCP.exe"
$url_sslKey = "http://http-server:3000/download/3"
$outputPath_sslKey = "C:\ssh\private.ppk"
$webClient = New-Object System.Net.WebClient
$webClient.DownloadFile($url_lib, $outputPath_lib)
$webClient.DownloadFile($url_exec, $outputPath_exec)
$webClient.DownloadFile($url_sslKey, $outputPath_sslKey)
Upload-FileBySFTP -LocalFilePath "D:\source\file_to_be_uploaded.zip" -RemoteFilePath "/file_to_be_uploaded.zip"
}
脚本详细说明
- 关于WinSCP Assembly文件准备细节
- WinSCP Assembly文件至关重要,需要在要上传的主机(在本例,是在一台远程SQL Server) 上准备好,这样上传脚本才能工作。
- 这些Assembly文件是:
WinSCP.exe和WinSCPNet.dll,均可以在WinSCP安装目录中找到。如果上传主机没有安装WinSCP,可以通过其他方法准备一份(例如通过http),放到一个上传主机的某个指定目录下。 - 最后在脚本中使用
Add-Type指令指定并加载。
注
WinSCP.exe 和 WinSCPNet.dll 必须在同一目录下,在例子,我指定了C:\ssh。。
- 如果上传主机上没有安装WinSCP Assembly文件
可以搭建一个简单的HTTP服务器,并使用脚本的webclient对象实现下载一个副本。本例中,是使用Node.js 的express部署一个http,提供下载WinSCP.exe和WinSCPNet.dll,以及sftp ssh私钥key。
- 关于免密登录sftp服务器的实现细节
免密登录是因为使用了SSH密钥对.
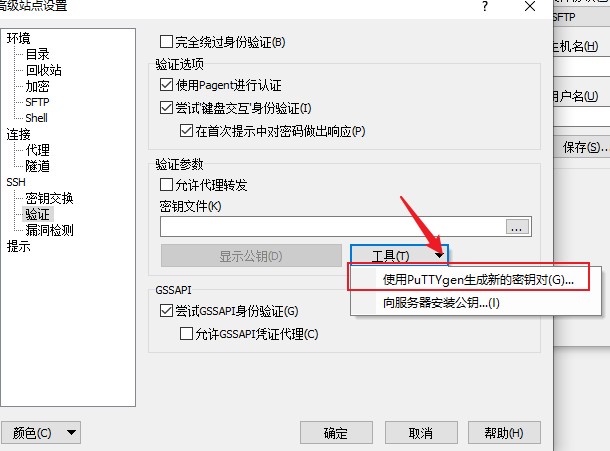
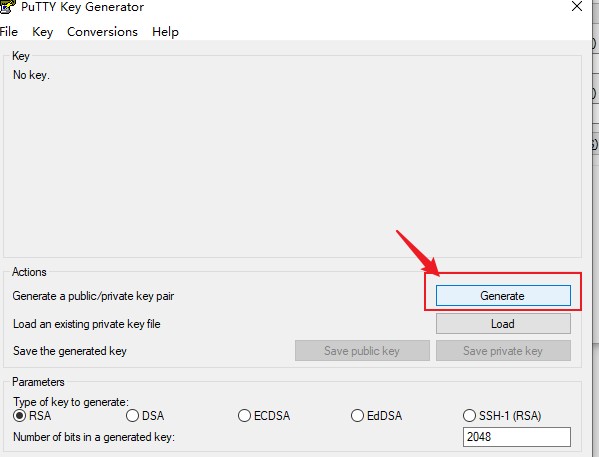
- 密钥对通过WinSCP/putty工具生成。
- 然后提前把公钥通过WinSCP下的putty上传到sftp用户主目录下。本例中使用的sftp服务器是sftpGo,是把公钥文本拷贝粘贴到用户profile里保存(通过sftpGO Web admin portal)。
提示
可以先通过WinSCP工具测试是否可以免密登录sftp服务器。
- 关于脚本中sftp SessionOption对象会话选项参数
WinSCP的会话参数是通过WinSCP会话工具代码模板生成器生成的,比较方便。使用方法是:
启动WinSCP,新建站点,并生成密钥对用于登录sftp服务器;
登录成功后,点击菜单上的【会话】,点击【代码生成】如下图:
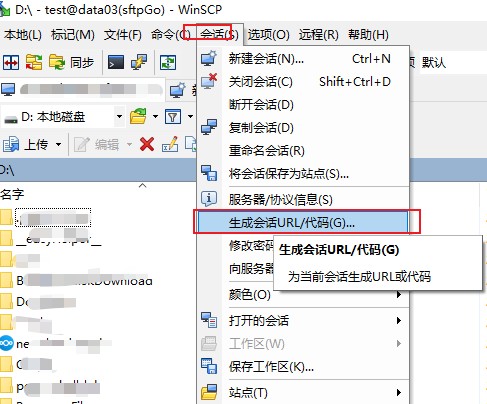
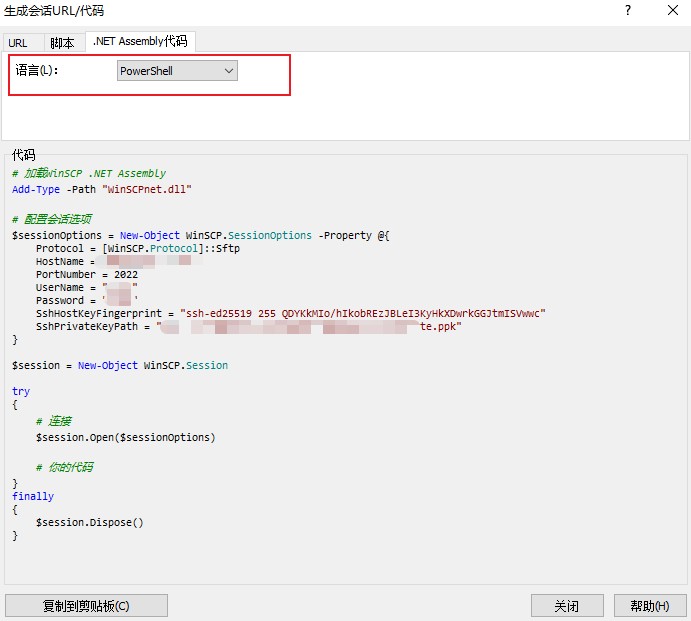
复制代码模板到Powershell ISE或其他IDE,最后再写文件上传代码